SpringBoot配置文件加载

SpringBoot 的配置加载主要通过事件广播机制来完成,即由 SpringApplication 启动过程中,通过调用 SpringApplicationRunListener.environmentPrepared() 触发 ConfigFileApplicationListenerApplicationEvent 事件的响应。

由于本文主要分析配置加载的流程,对于启动过程中的事件传播不做过多的介绍,直接从 ConfigFileApplicationListener 开始学习具体的配置加载流程。

1
2
3
4
5
6
7
8
9
10
11
12
13
14
15
16
17
18
19
@Override
public void onApplicationEvent(ApplicationEvent event) {
if (event instanceof ApplicationEnvironmentPreparedEvent) {
onApplicationEnvironmentPreparedEvent((ApplicationEnvironmentPreparedEvent) event);
}
if (event instanceof ApplicationPreparedEvent) {
onApplicationPreparedEvent(event);
}
}

private void onApplicationEnvironmentPreparedEvent(ApplicationEnvironmentPreparedEvent event) {
List<EnvironmentPostProcessor> postProcessors = loadPostProcessors();
// 将其自身添加到 EnvironmentPostProcessor 列表,用于处理配置文件的加载
postProcessors.add(this);
AnnotationAwareOrderComparator.sort(postProcessors);
for (EnvironmentPostProcessor postProcessor : postProcessors) {
postProcessor.postProcessEnvironment(event.getEnvironment(), event.getSpringApplication());
}
}

ConfigFileApplicationListener 里面,实际上是可以监听两类事件的,其中对 ApplicationEnvironmentPreparedEvent 事件的处理就是我们要学习的重点。该事件处理主要由 EnvironmentPostProcessor 完成的,默认情况下有三种 EnvironmentPostProcessor 实现,其中两种从 META-INF/spring.factories 加载获得,最后一种则是 ConfigFileApplicationListener 本身,也是我们要学习的重点,其实现了 EnvironmentPostProcessor 接口,并对 postProcessEnvironment() 方法进行了重写。

1
2
3
4
5
6
7
8
9
10
11
12
@Override
public void postProcessEnvironment(ConfigurableEnvironment environment, SpringApplication application) {
addPropertySources(environment, application.getResourceLoader());
configureIgnoreBeanInfo(environment);
bindToSpringApplication(environment, application);
}

protected void addPropertySources(ConfigurableEnvironment environment, ResourceLoader resourceLoader) {
RandomValuePropertySource.addToEnvironment(environment);
// 配置加载主逻辑在此
new Loader(environment, resourceLoader).load();
}

整个流程分为两个步骤:

  1. 通过内部类 Loader 完成 Environment 的加载
  2. 完成 EnvironmentSpringApplication 的绑定

ConfigFileApplicationListener#Loader 实现

1
2
3
4
5
6
7
8
9
10
11
12
13
14
15
16
17
18
19
20
21
22
23
24
25
26
27
28
29
30
31
32
33
34
35
36
37
38
39
40
41
42
43
44
45
46
47
48
49
50
51
52
53
54
55
56
57
58
59
60
61
62
63
64
65
66
67
68
69
70
71
72
73
74
75
76
77
78
79
80
81
82
83
84
85
86
87
88
89
90
91
92
93
94
95
96
97
98
99
100
101
102
103
104
105
public void load() {
this.propertiesLoader = new PropertySourcesLoader();
this.activatedProfiles = false;
// Profile队列,后进先出,与栈功能类似
this.profiles = Collections.asLifoQueue(new LinkedList<Profile>());
this.processedProfiles = new LinkedList<Profile>();

// 添加预置的 Profile,可以通过 Environment.setActiveProfiles() 指定
// 若未指定,则添加默认的 Profile,可通过 spring.profiles.default 指定Profile的名称
Set<Profile> initialActiveProfiles = initializeActiveProfiles();
this.profiles.addAll(getUnprocessedActiveProfiles(initialActiveProfiles));
if (this.profiles.isEmpty()) {
for (String defaultProfileName : this.environment.getDefaultProfiles()) {
Profile defaultProfile = new Profile(defaultProfileName, true);
if (!this.profiles.contains(defaultProfile)) {
this.profiles.add(defaultProfile);
}
}
}

// 在队列最后添加一个空的 Profile,使得其可以在第一个加载,即默认的配置文件会在所有指定了Profile的配置文件之前加载
// 如:application.properties 在 application-dev.properties 之前加载
this.profiles.add(null);

// 遍历所有 profile,逐个进行加载
while (!this.profiles.isEmpty()) {
Profile profile = this.profiles.poll();
// 按配置的查询路径查询配置文件,默认为:"file:./config/","file:./","classpath:/config/","classpath:/"
// 可通过配置 spring.config.location 进行指定
// 若配置的路径不以/结尾,则认定为是文件,会直接进行加载
for (String location : getSearchLocations()) {
if (!location.endsWith("/")) {
load(location, null, profile);
}
else {
// 按配置的名称查找配置文件,默认为:application,可通过 spring.config.name 进行调整
for (String name : getSearchNames()) {
load(location, name, profile);
}
}
}
// 将当前的profile添加到已处理列表
this.processedProfiles.add(profile);
}

// 将加载所得的 PropertySources 添加到 Environment 之中
addConfigurationProperties(this.propertiesLoader.getPropertySources());
}

private void load(String location, String name, Profile profile) {
String group = "profile=" + ((profile != null) ? profile : "");
if (!StringUtils.hasText(name)) {
// 未指定 name 的情况下,认为 location 就是完整的文件路径,直接进行加载
loadIntoGroup(group, location, profile);
}
else {
// 根据 PropertySourcesLoader 所支持的文件后缀名依次加载对应的配置文件
// 支持的文件有如下四种: "properties","xml","yml","yaml"
for (String ext : this.propertiesLoader.getAllFileExtensions()) {
if (profile != null) {
// 加载指定Profile的配置文件,只会加载yml文件里面的默认分块
loadIntoGroup(group, location + name + "-" + profile + "." + ext, null);
for (Profile processedProfile : this.processedProfiles) {
if (processedProfile != null) {
loadIntoGroup(group, location + name + "-" + processedProfile + "." + ext, profile);
}
}
// 加载 yml 文件中标识为 profile 的分块
// 如:当前 profile 为 dev, 则该调用会加载 application-dev.yml 文件中使用 "spring.profiles: dev" 标识的分块
loadIntoGroup(group, location + name + "-" + profile + "." + ext, profile);
}
// 加载默认配置文件中使用 profile 标识的特定分块
// 如:当前 profile 为 dev, 则该调用会加载 application.yml 文件中使用 "spring.profiles: dev" 标识的分块
loadIntoGroup(group, location + name + "." + ext, profile);
}
}
}

private PropertySource<?> loadIntoGroup(String identifier, String location, Profile profile) {
try {
return doLoadIntoGroup(identifier, location, profile);
}
catch (Exception ex) {
throw new IllegalStateException("Failed to load property source from location '" + location + "'", ex);
}
}

// 此方法中有部分Trace日志,已被清除,只保留有核心的逻辑
private PropertySource<?> doLoadIntoGroup(String identifier, String location, Profile profile)
throws IOException {
Resource resource = this.resourceLoader.getResource(location);
PropertySource<?> propertySource = null;
if (resource != null && resource.exists()) {
String name = "applicationConfig: [" + location + "]";
String group = "applicationConfig: [" + identifier + "]";
propertySource = this.propertiesLoader.load(resource, group, name,
(profile != null) ? profile.getName() : null);
if (propertySource != null) {
// 处理Profile属性,将新增的Profile添加到LIFO队列
// 如:从 application.yml 中读取到配置 spring.profiles.active: dev 则将 dev 加入到队列
handleProfileProperties(propertySource);
}
}
return propertySource;
}

在内部类 Loader 的实现里面,主要包括以下几个步骤:

  1. 添加 Environment.setActiveProfiles() 指定(或默认)的 Profile 到 LIFO 队列,并在队列最后添加一个空元素,以保证默认的配置文件优先加载,如:application.yml 优先 application-dev.yml 加载;
  2. 遍历 Profile 队列,依次进行加载,流程分为两个步骤:
    1. 按查询路径、文件名、后缀名等查找配置文件
    2. 解析配置文件,并将其添加到对应的分组
  3. 查找配置文件所在路径
    1. 按配置的查询路径查找配置文件,默认为:file:./config/file:./classpath:/config/classpath:/,可通过 spring.config.location 进行指定;
    2. 相同路径下,按配置的文件名前缀依次查找配置文件,默认为 application,可通过 spring.config.name 进行调整;
    3. 相同的文件名前缀,则按 PropertySourcesLoader 支持的文件名后缀进行查找,默认为:propertiesxmlymlyaml,其中 propertiesxmlPropertiesPropertySourceLoader 提供支持,ymlyamlYamlPropertySourceLoader 提供支持;
  4. 解析配置文件
    1. 对于 propertiesxml 文件,直接加载profile对应的文件即可;
    2. 对于 ymlyaml 文件,由于该类文件语法中支持分块配置,Spring 通过 spring.profiles 配置项可将文件分成多个块,加载过程也可以按块加载。未指定 profile 的情况下,直接加载 application.yml 的默认块,若指定 profile 为 dev,则按 application-dev.yml#defaultapplication-dev.yml#devapplication.yml#dev 进行依次加载;
  5. 将解析后所得的 PropertySources 添加到 Environment;

PropertySourcesLoader 实现

配置文件的解析与组装都是由 PropertySourcesLoader 完成的,PropertySourcesLoader 会将加载到的配置信息进行分组,并封装到 EnumerableCompositePropertySource 之中。

1
2
3
4
5
6
7
8
9
10
11
12
13
14
15
16
17
18
19
20
21
22
23
24
25
26
27
28
29
30
31
32
33
34
35
36
37
38
39
40
41
42
43
44
45
46
47
48
49
50
51
52
53
54
public PropertySource<?> load(Resource resource, String group, String name, String profile) throws IOException {
if (isFile(resource)) {
String sourceName = generatePropertySourceName(name, profile);
// 根据文件名后缀使用不同的 PropertySourceLoader 进行配置解析
for (PropertySourceLoader loader : this.loaders) {
if (canLoadFileExtension(loader, resource)) {
PropertySource<?> specific = loader.load(sourceName, resource, profile);
// 将解析好的 PropertySource 添加到对应的配置分组,默认情况下按 profile 进行分组
addPropertySource(group, specific);
return specific;
}
}
}
return null;
}

private String generatePropertySourceName(String name, String profile) {
return (profile != null) ? name + "#" + profile : name;
}

private void addPropertySource(String basename, PropertySource<?> source) {

if (source == null) {
return;
}

if (basename == null) {
this.propertySources.addLast(source);
return;
}

EnumerableCompositePropertySource group = getGeneric(basename);
group.add(source);
logger.trace("Adding PropertySource: " + source + " in group: " + basename);
// 已经存在对应的分组,则使用最新的进行替换
if (this.propertySources.contains(group.getName())) {
this.propertySources.replace(group.getName(), group);
}
else {
// 将新的分组,添加到列表的第一个,使得后加载的 profile 优先级更高
// 如:application-dev.yml 在 appliction.yml 之后加载,但获取配置时,application-dev.yml 优先级更高
this.propertySources.addFirst(group);
}

}

private EnumerableCompositePropertySource getGeneric(String name) {
PropertySource<?> source = this.propertySources.get(name);
if (source instanceof EnumerableCompositePropertySource) {
return (EnumerableCompositePropertySource) source;
}
EnumerableCompositePropertySource composite = new EnumerableCompositePropertySource(name);
return composite;
}

总结

Environment 加载需要理解文件的查找方式、加载顺序及加载完成后的配置优先级。

  • 查找方式:在文中已经描述的很清楚,按路径、文件名、后缀名依次逐级递进查找。

  • 加载顺序:相对就复杂了很多,以一张图概括如下:

图3.3 Environment加载顺序

Environment加载顺序

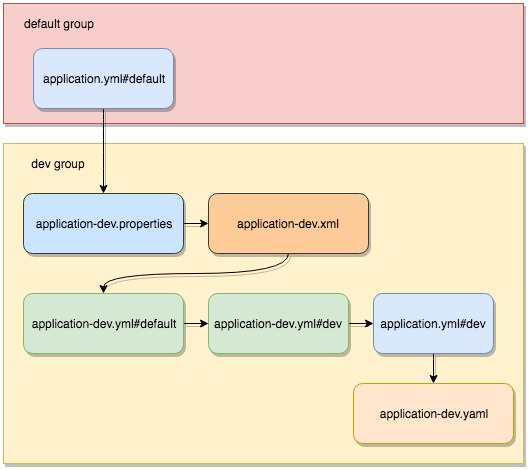
这里对 yaml 文件画的比较简单,实际上它与 yml 类似,也是分三步加载的。

  • 配置优先级:与加载顺序非常类似,唯一的区别是,组级别的顺序是相反的,先加载的组优先级低于后加载的组,即上图中的 dev 组会覆盖掉 default 组的配置。

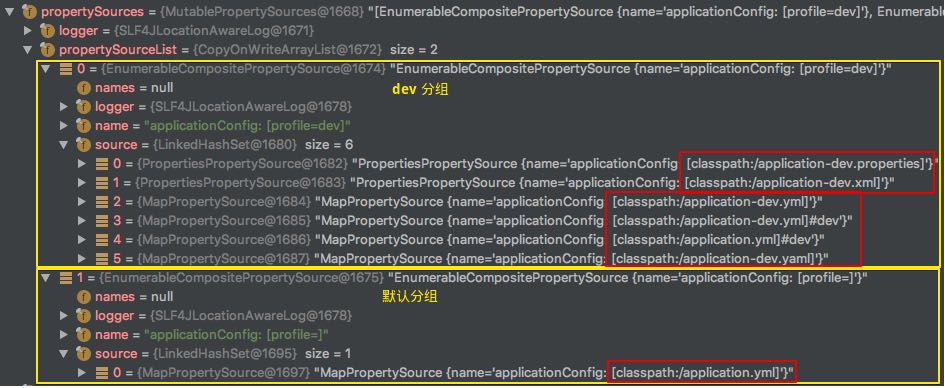
最后,再献上一张实验的结果图,与上图的内容一致,任意理解一个即可。

图3.4 Environment加载实验结果

Environment加载实验

qchery wechat
欢迎您扫一扫上面的微信公众号,订阅我的博客!